[ad_1]
WordPress is definitely one of best content management system with millions of plugins and themes. If you want to use WordPress in VPS, you must go with trusted and secure control panels for proper management of storage and memory. Vesta control panel is one of them. It is user-friendly and best free alternative of cpanel. This is a VPS guide on How to install WordPress on Vestacp at Amazon Web Service and DigitalOcean.
Features of Vesta control Panel.
Vestacp is a open source hosting control panel for ubuntu 16.04 server. This website control panel offers built in facilities like website, database, email, let’s encrypt encryption, backup, firewall, phpmyadmin and much more. Vesta control panel uses speed of Nignx at front end and robustness and stability of Apache at back end. As a result, sites managed by vesta are smooth and awesome performing.
Instead of lots of attractive features, vesta does not offer file manager in free version. However you can use FTP clients like filezilla as filemanager. Alternatively, you can purchase file manager of vesta at $50 for life time or $3/month.
Requirements to setup WordPress and VestaCP on Ubuntu VP
In this tutorial we are using following tools:-
#1 Create Ubuntu VPS and access using putty
First of all you need to create Ubuntu VPS on your cloud platform. If you are using Amazon cloud Platform, for this step you can refer our separate tutorial on how to create VPS on AWS. Digitalocean users can follow below steps to create and access VPS.

- Now, select OS image Ubuntu 16.04.3 x64 and scroll down to choose a suitable plan. Here I am selecting $5/month plan.
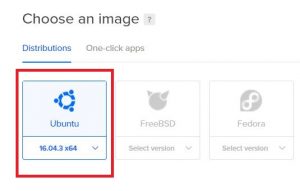
- After that, choose datacenter region according to location of your targeted traffic. In next step, you have to add SSH key to enable SSH access via putty.
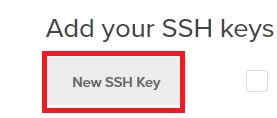
So first of all download and install Putty SSH client. Navigate to “C:Program FilesPuTTYputtygen.exe” and run puttygen.exe to create new SSH key.
- Now move mouse over blank area in key generator window to generate some randomness in key. Once generated, save both public and private keys.
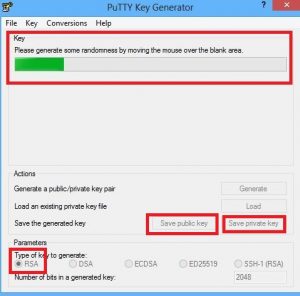
- After that, copy SSH key from Putty Key generator. Click on new SSH key button at digitalocean and paste content there. Type name of SSH and click on blue Add SSH Key button.
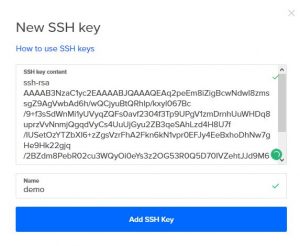
Now give desired name to your droplet but it is optional. Then click on green Create button and wait for few seconds. Your Ubuntu VPS is ready to use.
#2 Connect to Ubuntu VPS
Now its time to access your VPS using Putty. You can also use terminal or any other SSH client according to your preference.
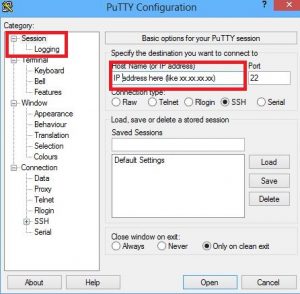
- Open Putty.exe from “C:Program FilesPuTTYputty.exe” and enter IP-address of your VPS.
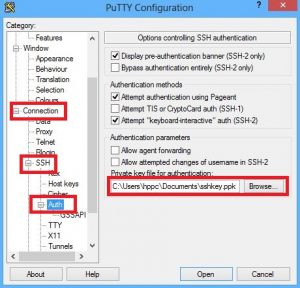
- From left list box, navigate to Connection >> SSH >> Auth. Then browse and select your private key for SSH authentication.
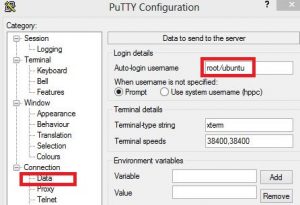
- Now go to Connection >> Data and enter auto-login username “root”. Amazon Web Services users enter username “ubuntu”.
Then hit open button to connect. You may encounter a warning, simply ignore it and proceed forward. From here VPS is created and now we will install vesta control panel.
#3 Install VestaCP on Ubuntu
To install vestacp, connect to VPS using SSH. If you are using AWS instance you must gain root permissions every time you connect using SSH. However this step is optional for DigitalOcean droplets. To gain administrative power in AWS VPS run below command
- Now download and install vestacp by running these two commands.
curl -O http://vestacp.com/pub/vst-install.sh
bash vst-install.sh -f
- After that, press Y and enter email address. Leave FQDN hostname option empty, just press enter.
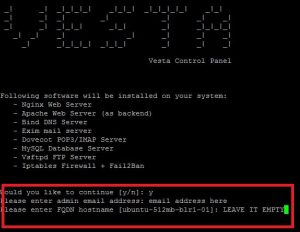
- Then wait for 5-10 minutes for control panel installation. At end, you will get vesta username and password, save it in safe place for future reference.
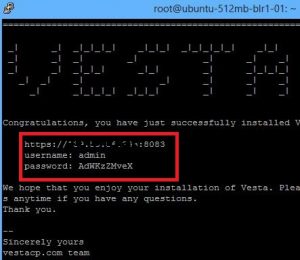
#4 Login to vesta control panel
Now you have to open vesta control panel using login credentials provided at the end of installation. So open your web browser and type IP address of your droplet/instance/VPS with “:8083”. For example XX.XX.XX.XX:8083, it tells browser that you want to access through 8083 port.

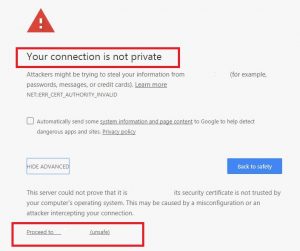
You may encounter warning message, simply ignore it. Click on advanced option and proceed to VPS as shown in screenshot. Then login to vesta using valid credentials.
#5 Create new site and database
After logging in, you will see seven options. Here we are going to use only two of them, WEB and DB.
![]()
- So first of all click on web option and add new web domain using yellow plus button.
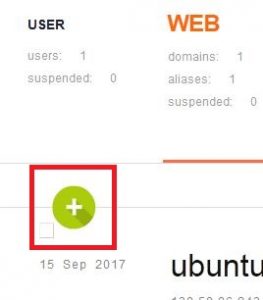
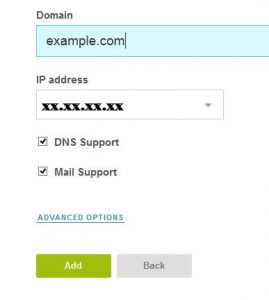
- Enter your domain name and ensure IP address of server. Then click add button.
- Similarly go to DB option and create new database using yellow + button. Enter database name, username and password. Then save all details and hit add button.
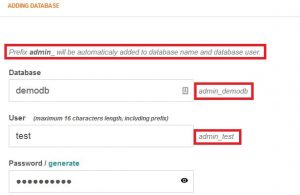
Remember that if you entered “demodb” as database name then vesta will automatically convert it to admin_demodb. In simple words, prefix admin_ will be automatically added to database name and database user. Hence your final database name and username will be something like admin_username. For more clearance you can refer screenshot.
Now you had successfully added new domain and database. If you had done, we can proceed now. Point to be noted that you can delete default domain and database. It is recommended to update default password of vesta control panel from admin section.
#6 Download and extract WordPress
Now we are going to download and extract WordPress package. After that we will update required details to start your own WordPress blog.
- Firstly, login to VPS using SSH as described in step 2. Then navigate to folder of your domain name using below command.
As mentioned above, Amazon Web services users always run [sudo –s] after connecting via SSH. It enables you to gain power of admin.
cd /home/admin/web/example.com/public_html
Don’t forget to replace example.com with your own domain name.
- After that download WordPress files using wget command.
wget https://wordpress.org/latest.zip
- Then extract latest.zip folder using unzip command.
- Now all files are extracted at location “/home/admin/web/example.com/public_html/wordpress”, but we need to move files at “/home/admin/web/example.com/public_html/” directory. So run command below.
cd /home/admin/web/example.com/public_html/wordpress
mv * .[^.]* ..
- Your WordPress files has been moved to correct location. You can check it by running following commands.
cd /home/admin/web/example.com/public_html/
ls
You will get output something like this.

- At last, delete index.html file because it shows error page. Also delete empty WordPress folder.
cd /home/admin/web/example.com/public_html/
rm index.htmlrmdir wordpress
rmdir WordPress [/su_note]
#7 Redirect domain to your VPS
Now its time to tell your domain where your VPS is. So login to domain name control panel or cloudflare control panel and add two A records. For more details see image below.

Your domain will start redirecting to VPS within few hours.
#8 Update wp-config file
Though there are many methods to update wp-config file, but I found it easiest of all. This method is suitable for newcomers. Once your domain name starts working, open it in your web browser. You will see a message something like this, simply hit let’s go button.
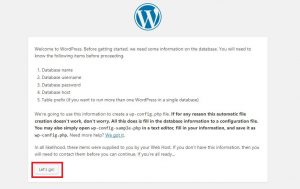
In next step, paste required details in their respective fields. Enter Database Name, Username, Password and leave other fields as it is.
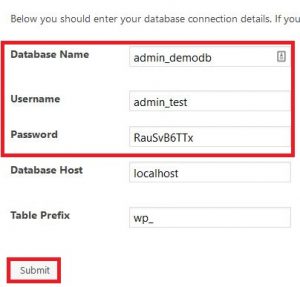
Then submit details and start famous five-minute WordPress installation process. Enter WordPress username, password email and install it.
Alternative method to update wp-config.php
Connect to VPS using FTP client Filezilla. Use login details of veta control panel to access FTP.

Now navigate to “web/example.com/public_html/” and locate wp-config-sample.php. Rename this file to wp-config.php and edit using notepad or notepad++.
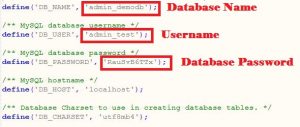
Enter required details like database name, username and password. Then hit save button and close editor. File will be uploaded automatically.
#9 Enable HTTPS in VestaCP (Lets Encrypt)
As you know encryption is most significant SEO factor these days. Hence you must know importance and procedure to enable SSL certificate. Enabling HTTPS in Vestacp is built-in and straightforward process.
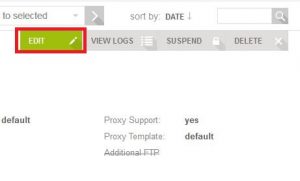
- Just login to vesta control panel and open WEB section. Find and hit edit option in front of your domain name.
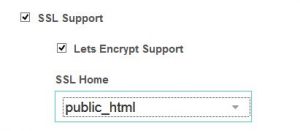
- Scroll down and enable SSL support option followed by Lets encrypt support option. Then save again.
After that, visit your blog using https://, Surprise! SSL certificate is active now.
Your WordPress blog is now completely installed and ready to use. Now here are some common problems and troubleshooting which you may face in AWS and DigitalOcean VPS.
#10 Plugin installation problem
While installing plugin first time, you may encounter connection information wizard. AWS users can simply bypass it by entering VPS IP address, vestaCP username and vetacp password.
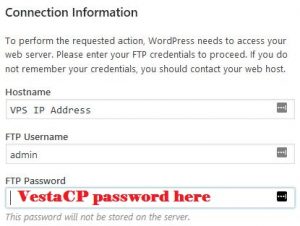
But condition becomes complicated for digitalocean Ubuntu users. If you are using digitalocean, connect using putty SSH client by following step 2. Then run command.
cd /home/admin/web/example.com/public_html
chown admin -R *
Do not forget to replace example.com with your own domain name. Then close SSH connection and refresh plugin installation page. Try reinstalling plugins and it must work smoothly.
#11 Theme and plugin upload problem
In Ubuntu VPS, upload limit is limited by default. That’s why when you try to upload theme or plugin, you encounter error “The uploaded file exceeds the upload_max_filesize directive in php.ini”. To overcome this problem, you must increase upload file size limit in your VPS.
For this, first of all connect using FTP (use vesta admin and password) and navigate to directory of PHP. It may be located on basis of your PHP version. In general it must be as follows.
/etc/php/7.0/apache2/php.ini
or
/etc/php5/apache2/php.ini
Then right click on php.ini and select edit. Now edit following details and re-upload file by clicking save button.
- Navigate to resource limits section and set max_execution_time = 180
- Then go to data handling section and set post_max_size = 64M
- Navigate to file uploads section and set upload_max_filesize = 64M
- After that, go to file uploads section and set max_file_upload = 64
That’s it. After re-uploading file, try to upload theme/plugin.
#12 SSL secure lock not showing
After enabling SSL from vesta control panel, everything must work fine. But sometimes secure lock does not appear and design issues occur. You can eliminate this issue in seconds, just login to wordpress and install “Really Simple SSL plugin”. Then go to Settings>>General and set your site URL as https://www.example.com, save and check site again.
So this was tutorial to install WordPress on vestaCP at AWS and DigitalOcean. Please comment your problems and do not forget to hit share button.
[ad_2]


![BSNL Balance Transfer - [Transfer Balance BSNL to BSNL] • Tech Maniya](https://trickspedia.net/file/2017/10/bsnl-balance-transfer-150x150.png)


